...
Overview
This page is intended to guide the user through removal and replacement of MEI AE2600 Series and MEI Talos bill note acceptors.
Overview
This page is intended to guide the user through removal and replacement of MEI AE2600 Series and MEI Talos bill note acceptors.
On this page
| Table of Contents |
|---|
| Multiexcerpt include | ||||||
|---|---|---|---|---|---|---|
|
Required Hardware
...
| Info |
|---|
Bill note acceptors vary across cabinet types and may not offer cross-compatibility. Please contact Technical Support before ordering a replacement bill note acceptor (BNA) to ensure you obtain the correct model for your machine. For Pyramid Bill Note Acceptor Replacement, |
...
see C-5821 Pyramid APEX Bill Note Acceptor (BNA) and LaundryCard |
| Bw part list | ||||||||||||||||
|---|---|---|---|---|---|---|---|---|---|---|---|---|---|---|---|---|
|
Recommended Tools and Supplies (Not Included)
...
Phillips head screwdriver
...
...
Socket wrench
Socket: 11/32"
...

Installation
...
11/32” socket/wrench
Installation
Step 1 - Remove Bill Cassette

Open the front door of the cabinet.
Remove the bill cassette from the bill note acceptor.
Step 2 - Disconnect BNA Power and Data
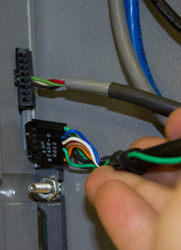
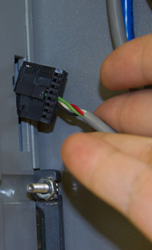
Disconnect the power and communication harnesses connected to the right side of the bill note acceptor.
Use caution - do not pull on the wires as doing so with sufficient force may detach them from the connector.
Step 3 - Remove BNA from Cabinet Door

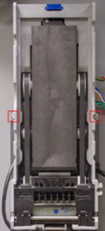
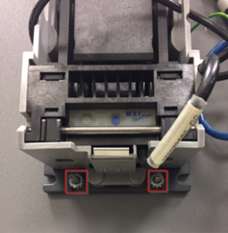
Locate and remove the four (4) 11/32" kep nuts (outlined in red).
On the C-1002 model (V1 X-Changer Cabinets) one nut is located on each side of the BNA and two are located near the top.
On C-1004, C-1004-V2, C-5660, and C-5820 models (V2 X-Changer Cabinets, Add Value Kiosks, and Touch Kiosks) one nut is located on each side of the BNA and two are located near the bottom.
Step 4 - Install New BNA
Install the new bill note acceptor into the opening created by removing the previous acceptor.
Reverse the preceding steps to install.
Tighten kep nuts in appropriate locations.
Connect power and communication harnesses as previously connected:
C-1004-V2 Talos BNAs in V2 X-Changer Cabinets use the exact same power and communication harnesses as the MEI Legacy 2000 BNAs typically found in a non-Pyramid X-Changer build:
C-1003 BNA Serial Interface cable.
C-1037R1 BNA Power Cable V2.
C-1004-CBL Stock BNA Cable for connecting the C-1037R1 BNA Power Cable to the Power port on the bill acceptor.
If using a Talos BNA in an Add Value Kiosk, ensure the newer C-5690R2 communication harness is being utilized. The legacy C-5690 interface harness is incompatible with Talos BNAs.
If using the C-1004-V2 Talos BNA in a Touch Kiosk, the C-5660-110P BNA Power Cable is required. The 9-pin 24v connector on the Touch Kiosk Power Controller will not be able to power the C-1004-V2 Talos BNA.
Attach bill cassette.
Powering C-1004-V2 Talos BNAs in a Touch Kiosk
Unlike the legacy C-5660 MEI BNA and C-5660-V2 Talos BNA that utilize the 9-pin 24v port on the Power Controller, the C-1004-V2 Talos BNA has a 110vac power requirement. The C-5660-110P BNA Power Cable is specifically designed to power the C-1004-V2 Talos BNA within a Touch Kiosk by drawing power directly from the power supply's Load (L) and Neutral (N) terminals.
...