Overview
This page is intended to guide the reader through preventative maintenance techniques for their Dell computer housed inside their LaundryCard X-Changer.
| Note |
|---|
Card Concepts Inc takes no responsibility for data loss due to human error, hardware failure, or other such circumstances. |
On this page
panel| Table of Contents |
|---|
Required items
| Table of Contents |
|---|
| Panel | ||||
|---|---|---|---|---|
| ||||
|
Requirements
- Canned Air
- Cloth
Opening the Computer
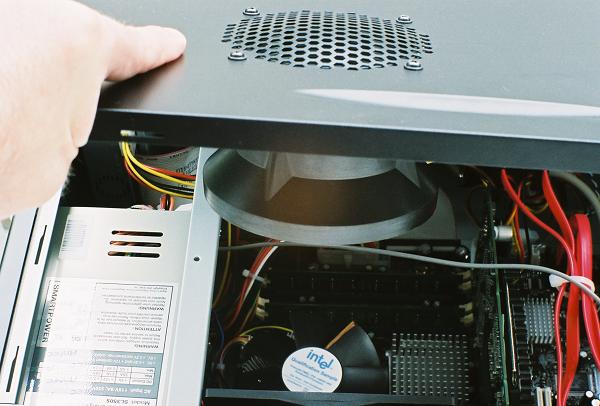
Open computer by pulling side. When you do this pull the lever towards you. The lid should pop open and you can remove it.
As soon as you get the lid off you have to remove the hard drive bracket. To do this push in the two plastic tabs towards --> <--- each other.

As your removing the hard drive bracket there are 2 cables connected to the hard drive. Gently remove these cables from the hard drive and then remove the hard drive.

After you remove the bracket and hard drive the inside of your computer should like this

Looking for Blown Capacitors
You now can look for blown capacitors. Blown capacitors should look like this:
Note title IMPORTANT NOTE If you see one or more blown capacitors, your computer will need replacement or the motherboard would need replacement. Contact your local computer service or CCI to discuss repair options.
Compressed air
Small static free brush
Lint-free cloth
Step-by-step guide
Frequency of cleaning: Every six months
Opening the computer
Shut the computer down through Windows, then unplug the power cable.
Locate the cover release latch on the side panel, then slide the release latch back while lifting the cover.
Grip the sides of the computer cover and open it using the hinges as leverage points.
Loosen the hard drive cradle by pinching its two blue tabs. Disconnect the two cables from the hard drive, then lift the cradle up and out.

After the hard drive is removed, most of the motherboard components are visible. Check for bulging or leaking capacitors.
Healthy Capacitors | Damaged Capacitors |
|---|---|
|  |

| Warning |
|---|
If the capacitors are damaged in any way, you can have the computer repaired under warranty. See Dell Support Process for details. |
Cleaning inside the computer
| Info |
|---|
Perhaps the most serious |
threat to |
As more and more dust accumulates on the blades and in the motors, the fans have to work harder. If the
a computer is heat. Overheating can cause component failure and, ultimately, data loss. To keep cool, computers use fans to pull fresh air in while pushing hot air out. Over time, dust collects on fan blades and makes them heavier, which makes the motors work harder. If buildup goes unchecked, the fans may significantly slow down or fail completely. |
Starting with the power supply where the main cable goes, blow
compressed air from inside of the
computer so dust
is forced out.
| Good Cpu Fan | Bad Cpu Fan |
|---|
Next, blow into the intake fan (if there is one) to push more dust out the back. Finally, blow the blades of the rear exhaust fan clean. If possible, aim just beneath the center, where the motor meets the fan assembly, and blast again. Repeat the process for each fan, keeping the can upright at all times.

To loosen clumps of dirt, hold your canned air at multiple angles rather than using long bursts of air. Make sure that you do not touch anything inside of the CPU tower.

Set the canned air aside and close up your cpu

Locate each fan, and remove all dust from the blades. Again, try to aim so the dust is forced outside the computer.
One fan is located on the motherboard, over the heat sink.
One fan is located on the side of the computer, blowing air out of the computer.
Target the exterior vents as well, using a small brush or vacuum to loosen any clumps. Use short bursts of air and try not to touch the internal components.
Wipe up any remaining dust with a cloth instead of paper towel, which can leave particles behind. Once clean, replace the computer cover and make sure it clicks into place.
| Filter by label (Content by label) | ||||||||||||||
|---|---|---|---|---|---|---|---|---|---|---|---|---|---|---|
|